Philiphine Cheptanui

I am a dedicated computer network specialist

Philiphine Cheptanui

A dedicated Network, Cybersecurity and Digital Forensics Specialist focused on designing secure, resilient infrastructures through advanced threat detection, zero-trust frameworks, and cloud security best practices. Passionate about safeguarding networks with firewalls, SIEM tools, and penetration testing while automating defenses for efficiency. Committed to staying ahead of evolving cyber threats and driving secure digital transformation in enterprise environments by leveraging technology to build secure systems and investigate digital threats.

  • 00100, Nairobi, Kenya.
  • +254 909-40575
  • koimaphilipine@gmail.com
  • https://compnetworksecurity.blogspot.com/
Me

My Professional Skills

Building resilient networks and cloud defenses for the digital age.


Switching and Routing, VLANS, WPA3, VPN and Firewall 95%
IDPS, NAT, Vulnerability Assessment, SIEM and EDR 80%
Secure DevOps 65%
Wordpress 85%

Secure Network Infrastructure Solutions

Future-proof your connectivity with battle-tested architectures!
Design, configure, optimize, and deploy secure LAN/WAN/VPN networks. Secure your existing network infrastructure by troubleshooting your routers, switches and firewalls and hardening Wireless network infrastructure

Cybersecurity Protection

Stay three steps ahead of threats!
Configure IDS/IPS and firewall, assess vulnerability and test for penetration, audit security compliance for risk mitigation and plan to respond to incidences.

Cloud Network Security

Migrate fearlessly. Operate securely!
Secure cloud migration, implement zero-trust architecture, and deploy SIEM for real time threat monitoring.

Wordpress and System Security

Shield your digital presence.
Harden Wordpress sites and secure ERP deployments.

IoT and Smart Device Security Hardening

Securing the connected world – one device at a time!
Segment vulnerable devices, assess vulnerabilty, Implement IoT-specific firewalls, secure wireless protocols and ensure compliance with IoT security frameworks.

Security Training and Consultation

Knowledge is the strongest firewall!
Offer training on cybersecurity best practices for team, and audit networks security and provide actionable reccommendations.

0
completed project
0
design award
0
LinkedIn Impressions
0
current projects
  • Five Types of HTTP Headers


    Figure 1: HTTP Headers

    HTTP Headers

    Statement Problem - Understand the operation of HTTP Headers as they pass information between the client and server. 

    Approach: Discussion

    Tools - Basic understanding of HTTP communication and cURL

    Introduction

    HTTP headers pass information between client and server. While some headers are used by both requests and responses, some are only used by either requests or responses. These headers can have one or more values appended after the header name and separated by a colon. There are five types of headers. 

    Discussion

    General headers are used by both HTTP requests and responses. They are used in specific contexts to describe the message and not its contents. Examples include the date (date: Wed, 16 Feb 2025 10:30:44 GMT) that describes the time zone in which the message originated. Another example of a general header is a connection (Connection: close), that dictates if the current network connection should stay alive after the request finishes. The connection header normally has two values including close and keep-alive.

    Entity headers are common to requests and responses. They are used to describe the content transferred by the message. They include content-type (text/html), media-type (application or pdf), a boundary that acts as a marker to separate content, content-length (385), and content-encoding (gzip). 

    Request headers are used exclusively for requests alone and do not relate in any way to the content of the message. The request headers include host (www.nnnn.co.ke) which specifies the host being queried, user-agent (curl/7.77.0) describes the client requesting resources, referrer (https://www.nnnn.co.ke) points to where the current request is coming from, accept (*/*) that describes the media types that the client can understand and a cookie that contain cookie value pairs in name=value. It also has authorization (basic….) that the server uses to identify the client.

    Response headers are used in HTTP responses and do not relate to the content of the message in any way. Common response headers include location, age, server, set cookie (Cookies needed for client identification), and www-authenticate which notifies the client about the type of authentication required to access the required resource. 

    Security headers are a type of response headers used to specify the rules and policies to be followed by the browser while accessing the website. They include content-security-policy, strict-transport security and referrer-policy.


    Philiphine Cheptanui, CyberSec


  • HTTP Requests and Responses


    HTTP Requests and Responses

    Problem Statement - Explore HTTP Communication to decipher the structure and the meaning of HTTP communication.

    Approach - Explanation of HTTP 

    Tools used - cURL, Basic understanding of web communication

    Introduction

    HTTP request is made by the client such as cURL or browser, is processed by the server that then sends an http response containing the response code, and likely, the requested resource. An HTTP request contains three main paths including the HTTP method e.g. GET which specifies the type of action to perform, the path to the resource being accessed, and the version of the HTTP in use. See Figure 1.

    Figure 1: HTTP Request
    An HTTP response has two main fields and other details. The two main fields are the HTTP version and the response code i.e. 200 OK.  The response code is used to determine the status of the request. See Figure 2.
    Figure 2: HTTP Response
    To preview full HTTP request and full HTTP response, use cURL. This is useful for writing exploits and penetration tests. To do this, issue curl www.naconek.ke -v where the -v flag prints both the request and the response. the output details can be enhanced by using -vvv to verbose further. See Figure 3 below. 
    Figure 3: Full HTTP Request and Response in cURL

    Using DevTools to Monitor HTTP Communication
    Browser developer tools are mainly used by developers to test web applications and are critical tools for penetration testers. In this section, I explored how I can utilize DevTools to assess and monitor different types of web requests. When one visits a web application, the browser sends several requests and receives several HTTP requests to render the final output to the user. The DevTools shows the status of the request or response at a glance. In Firefox, use CTRL +SHIFT+I or F12 to display the DevTools. See Figure 4. 
    Figure 4: DevTool and HTTP Commnucication

    This activity demosnstrate the usefulness of DevTools in monitoring HTTP communications. Using the network tab, DevTools can give more insights into the processes happening behind the scenes when a client requests for a resource from the server. 

    Philiphine Cheptanui, CyberSec.

  • Understanding Web Requests (HTTP and HTTPs Fundamentals)

    Problem Statement - Understand the underlying mechanism of web communication

    Approach - Explanation of URL components, HTTP vs. HTTPS, client-server model, and DNS resolution flow.

    Tools Used - Web browser, cURL and conceptual understanding of DNS servers.

    Introduction

    Understanding web requests is critical for any cybersecurity enthusiast to be successful. It focuses on how web applications work. The first focus is on HyperText Transfer Protocol (HTTP). HTTP is an application layer protocol that is used to access the World Wide Web resources. Hypertext stands for texts that contain links to other resources and texts that can reader can understand. Since HTTP communication is client and server, the client requests resources from the server that processes the request and returns the requested resources. The default port for HTTP communication is port 80 and that of HTTPS is port 443. To fully access the web, the user must enter a fully qualified domain name as a Uniform Resource Locator (URL) to reach the desired website. A URL has different specifications including the scheme that describes the protocol being accessed, user information that contains the credentials of the client, a host that contains the resources being requested, a port that defines the way to access the server, a path that points to the location of the requested resource, query string that consists of parameters and value and the fragment (See Figure 1).  It is worth noting that not all of these components are required to access web resources. However, scheme and host are essential to access the resource. 


    Figure 1: Components of a URL

    Activity and Lessons Learned

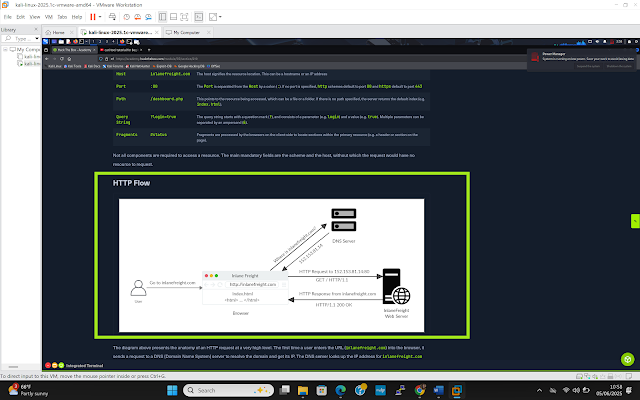
    I explored a typical HTTP flow and learned that it involves two main processes. The first process happens when the client enters the domain name on the browser. The browser will contact the preferred DNS server to resolve the domain name to IP. In this process, the browser will first look at its local cache if it has looked up the address recently. If not, the browser forwards the request to the Recursive DNS server that also checks its local cache if it has recently looked up the address. If yes, the recursive DNS relays the IP address to the client and the request ends. If not, the recursive DNS will forward the request to the Internet’s Root DNS servers which will determine the correct Top-Level Domain (TLD) server to process the address. The TLD server will then forward the request to the authoritative server that will process the address and return the IP address. The TLD and recursive DNS servers will save the address in their local cache and relay it to the browser.

    The second process happens when the browser has received the IP address of the desired domain name. The client will send the HTTP GET request to port 80 asking for the root path. The server receives the request, processes and returns it with a 200 OK. The web browser then renders and outputs it to the user (See Figure 2). 

    Figure 2: HTTP Flow

    Client URL (cURL)

    Client URL is a command-line tool used to send various types of web requests from the command line. When returning responses, cURL does not render and presents it in raw format. Client URL uses various flags for various purposes as seen in Figure 3. 

    Figure 3: cURL Flags
    To demonstrate that cURL can be used to send requests to the server and recieve responses, I used command-line by issuing the command - $curl 94.237.54.54:42524/download.php on cURL. The server responded with the resource i.e the requested flag. See Figure 4.
    Figure 4: Requested Flag

    Note: In HTTP, data is transferred in clear-text, giving room for Man-in-the-middle (MiTM) Attacks.

    HyperText Transfer Protocol Secure (HTTPs)

    HTTPs are a more secure protocol and are used to counter the risks associated with transferring data in clear text seen in HTTP. In this protocol, all communication/data are transmitted in encrypted format, making it difficult for the third party to extract and retrieve the data. When HTTP is transferring data, the data is in plain text and anyone can easily read it. But with HTTPs, the data is encrypted and transferred as Application data, which is transferred as a single encrypted stream, making it difficult for any malicious actor to capture information such as credentials (See Figure 5). HTTPS websites are identified through the https:// scheme

    Figure 5: HTTPs Overview

    Note * While HTTPs transfers data/communication in an encrypted format, the request may still reveal the visited URL if it contacts a clear-text DNS server. Thus, it is safe to use encrypted DNS servers such as 8.8.8.8 or 1.1.1.1 or use a VPN service to ensure all traffic is encrypted.

    HTTPs Flow

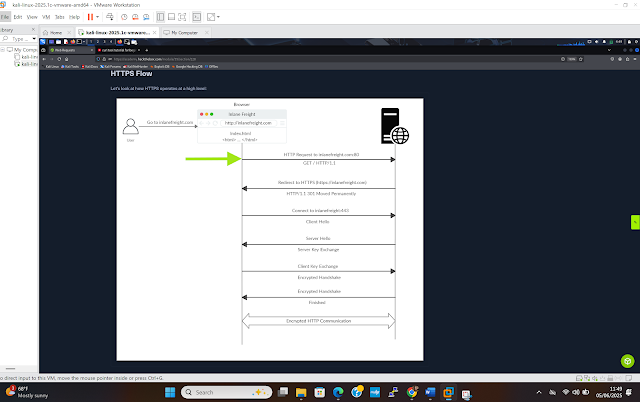
    When a client types http:// to visit an https:// site, the browser will attempt to resolve the domain. It redirects the user to the web server hosting the target website, and the request is sent to the web server through port 80 – this is an unencrypted HTTP protocol. The server detects this and redirects the client to secure port 443. This redirecting process is achieved through the 301 Moved Permanently response code. Upon receipt of the server response, the client sends a client hello packet to introduce itself, and the server responds with a server hello message. This process is followed by key exchange to exchange SSL certificates from the server and the client verifies the certificate and sends its certificate. It will then initiate an encrypted handshake to confirm whether the encryption and transfer are working correctly. After the handshake completes successfully, normal HTTPs communication resumes. See Figure 6 for details.


    Figure 6: HTTPs Flow
    Just like HTTP, cURL handles HTTPs communications, performs secure handshake, and encrypts and decrypts data automatically. However, if the website has an invalid/outdated SSL certificate, then cURL would not proceed with the communication to protect against the MiTM attack. However, the certificate-checking process can be bypassed by using the -k flag. See Figure 7.
    Figure 7: cURL for HTTPs

    This activity is a comprehensive exploration of web requests, fundamental for cybersecurity. It elucidates the client-server communication model of HTTP and HTTPS, detailing URL components and the crucial DNS resolution process. The security implications of clear-text HTTP versus encrypted HTTPS are highlighted, along with the functionality of cURL for command-line interactions.
  • Common Computer Networks Threats and Vulnerabilities


    In today’s digital age, computer networks are the backbone of businesses, governments, and personal communications. However, with increased connectivity comes the risk of cyber threats and vulnerabilities that can compromise sensitive data, disrupt operations, and lead to financial losses. In this section, we’ll explore common network threats, the vulnerabilities that attackers exploit, and best practices to protect your systems.

    Common Computer Network Threats

    1. Malware Attacks

    Malicious software, or malware, includes viruses, worms, ransomware, and spyware designed to infiltrate systems, steal data, or cause damage.

    • Example: Ransomware like WannaCry encrypts files and demands payment for decryption.

    2. Phishing & Social Engineering

    Cybercriminals trick users into revealing sensitive information (passwords, credit card details) through fake emails or websites.

    • Example: An email pretending to be from a bank asking for login credentials.

    3. Denial-of-Service (DoS/DDoS) Attacks

    Attackers flood a network with excessive traffic, making services unavailable to legitimate users.

    • Example: A DDoS attack on a company’s website causing downtime.

    4. Man-in-the-Middle (MitM) Attacks

    Hackers intercept communication between two parties to steal or alter data.

    • Example: Attackers eavesdropping on unsecured Wi-Fi connections.

    5. Insider Threats

    Employees or contractors with access to sensitive data may intentionally or accidentally cause security breaches.

    • Example: A disgruntled employee leaking confidential company files.

    Common Network Vulnerabilities

    vulnerability is a weakness in a system that can be exploited by attackers. Some major vulnerabilities include:

    1. Unpatched Software

    Failing to install security updates leaves systems open to known exploits.

    • Solution: Regularly update operating systems and applications.

    2. Weak Passwords & Poor Authentication

    Simple or reused passwords make it easy for hackers to gain access.

    • Solution: Enforce strong passwords and multi-factor authentication (MFA).

    3. Misconfigured Firewalls & Security Settings

    Improperly set up firewalls or open ports can allow unauthorized access.

    • Solution: Regularly audit and tighten security configurations.

    4. Lack of Encryption

    Unencrypted data (emails, files, network traffic) can be intercepted.

    • Solution: Use SSL/TLS for websites and VPNs for secure remote access.

    5. Outdated Hardware & Software

    Older systems may no longer receive security patches, making them high-risk.

    • Solution: Replace outdated hardware and upgrade unsupported software.

    How to Protect Your Network

    1. Use Firewalls & Intrusion Detection Systems (IDS) – Monitor and block suspicious traffic.

    2. Regularly Update & Patch Systems – Fix known security flaws.

    3. Train Employees on Cybersecurity – Educate staff on phishing and safe browsing.

    4. Implement Strong Access Controls – Use role-based access and MFA.

    5. Backup Critical Data – Ensure recovery options in case of ransomware or data loss.

    Final Thoughts

    Cyber threats are constantly evolving, but understanding common network vulnerabilities and adopting proactive security measures can significantly reduce risks. By staying informed and implementing best practices, businesses and individuals can safeguard their digital assets.

    🔹 Have you experienced a network security breach? Share your thoughts in the comments!

    📌 Follow my page for more cybersecurity tips and tech insights!

    #CyberSecurity #NetworkSecurity #TechBlog #CyberThreats #DataProtection


    Philiphine Cheptanui, CyberSec.
  • Understanding the Backbone of the Internet: OSI vs. TCP/IP Models

     Ever wondered how your emails fly across continents or how you stream videos seamlessly? It all boils down to two fundamental networking frameworks: the OSI Model and the TCP/IP Model! Let's break them down. 

    The OSI (Open Systems Interconnection) Model is a conceptual framework that standardizes communication functions of a telecommunication or computing system. Think of it as a detailed blueprint with 7 distinct layers, from the physical hardware all the way up to the application software. It's fantastic for understanding the theoretical flow of data! 

    On the other hand, the TCP/IP (Transmission Control Protocol/Internet Protocol) Model is the practical, widely implemented model that the internet actually runs on! It's a more streamlined, typically 4-layer architecture, combining several OSI layers. It's the workhorse that makes global connectivity possible. 

    Key Differences at a Glance:

    Layers: OSI has 7 layers, TCP/IP typically has 4 (or 5).
    Purpose: OSI is a theoretical reference, TCP/IP is a practical implementation.
    Adoption: TCP/IP is the dominant model for the internet.
    Both models are crucial for network professionals to understand. The OSI helps us troubleshoot and conceptually grasp complex network interactions, while TCP/IP is what we work with day-to-day to build and maintain networks.

    Which model clicked for you first when you were learning networking? Share your thoughts below! 

    hashtagNetworking hashtagOSIModel hashtagTCPIP hashtagTechEducation hashtagInternetBasics hashtagCybersecurity hashtagITPro hashtagLearnWithMe

    Philiphine Cheptanui, CyberSec.
  • Level Up Your Networking Skills: Why Virtual Labs are Your Best Friend


    So, you're diving into the fascinating world of computer networks or perhaps tackling some hands-on lab exercises? That's fantastic! But before you start racking up physical hardware and tangling cables, let me let you in on a secret: virtualized environments are your ultimate playground.

    Forget the hefty price tags, the space constraints, and the risk of frying expensive equipment. Virtualization offers a powerful, flexible, and safe space to hone your networking prowess and conquer any lab challenge. Let's explore why it's so crucial:

    Why Go Virtual for Networking Practice?

    • Cost-Effective: Building a physical network lab can be incredibly expensive. Routers, switches, firewalls, servers – the costs quickly add up. Virtualization allows you to simulate these devices using software, significantly reducing hardware expenses.
    • Flexibility and Scalability: Need to quickly add another router or spin up a new subnet? In a virtual environment, it's just a few clicks away. Scaling your network up or down to match your learning needs becomes incredibly easy and fast.
    • Safety and Isolation: Experimenting with network configurations can sometimes lead to unexpected outcomes. In a virtual environment, your host system and other networks remain completely isolated. You can break things, experiment fearlessly, and learn from your mistakes without causing real-world disruptions.
    • Repeatability and Automation: Want to test a specific scenario multiple times? Virtual environments allow you to save snapshots of your lab setup, enabling you to revert to a known good state in seconds. You can even automate the deployment and configuration of network devices, streamlining your learning process.
    • Portability and Accessibility: Your virtual lab resides on your computer, meaning you can take it anywhere. Whether you're at home, in a coffee shop, or traveling, your learning environment is always accessible.
    • Diverse Device Emulation: Virtualization software supports a wide range of network devices from various vendors. This allows you to gain experience with different command-line interfaces, features, and functionalities without needing to purchase physical hardware from each manufacturer.
    • Easy Troubleshooting and Analysis: Virtual network monitoring tools and packet capture software integrate seamlessly with virtual environments, making it easier to diagnose network issues and analyze traffic flow.

    What You Need to Get Started: Hardware Requirements

    While virtualization saves you money on dedicated networking gear, your host computer needs to be up to the task. Here's a general idea of what you'll need:

    • Processor (CPU): A multi-core processor (ideally Intel Core i5 or equivalent AMD Ryzen or higher) is recommended. Virtual machines consume CPU resources, so more cores and higher clock speeds will lead to better performance, especially when running multiple virtual devices. Look for CPUs with virtualization extensions (Intel-VT or AMD-V) enabled in your BIOS.
    • RAM (Memory): This is crucial. Each virtual machine you run will require its own allocation of RAM. Aim for at least 8GB of RAM, but 16GB or more is highly recommended, especially if you plan on running multiple complex virtual devices simultaneously.
    • Storage (Hard Drive/SSD): You'll need sufficient storage to hold the virtualization software, the virtual machine images (which can be quite large), and any data you generate in your lab. A Solid State Drive (SSD) will significantly improve the performance of your virtual machines compared to a traditional Hard Disk Drive (HDD). Aim for at least 256GB, but 500GB or 1TB is preferable.
    • Network Interface Card (NIC): A standard Ethernet port is usually sufficient for basic virtual networking. However, if you plan on experimenting with more advanced networking scenarios or bridging your virtual network with your physical network in specific ways, having multiple NICs might be beneficial.

    Essential Software for Your Virtual Lab

    Now for the software that brings your virtual network to life:

    • Hypervisor (Virtualization Software): This is the core software that allows you to create and manage virtual machines. Popular options include:
      • VirtualBox (Free and Open Source): A great starting point, user-friendly, and cross-platform.
      • VMware Wo
        rkstation Player (Free for non-commercial use) / VMware Workstation Pro (Paid):
        Industry-standard with advanced features and excellent performance.
      • Hyper-V (Built-in to Windows Pro, Enterprise, and Server editions): A powerful hypervisor integrated directly into the Windows operating system.
      • GNS3 (Free and Open Source): Specifically designed for network simulation, it excels at emulating Cisco and other network devices.
      • EVE-NG (Free Community Edition / Paid Professional Edition): Another powerful network emulator known for its support of a wide range of vendors and its graphical interface.
    • Operating System Images (ISOs): You'll need operating system installation files (ISOs) to install on your virtual machines. This could include various Linux distributions (like Ubuntu Server, CentOS), Windows Server, or even desktop operating systems depending on your lab requirements.
    • Network Device Images: For emulators like GNS3 and EVE-NG, you'll need images of the network devices you want to simulate (e.g., Cisco IOS images, Juniper Junos images, etc.). These may require specific licensing depending on the vendor.
    • Networking Tools: Having tools like Wireshark (for packet analysis), Nmap (for network scanning), and various command-line utilities (ping, traceroute, netstat) installed on your host or within your virtual machines will be invaluable for troubleshooting and learning.

    Get Ready to Explore!

    Working in a virtualized environment is a game-changer for anyone serious about learning computer networks and mastering lab activities. It provides a safe, flexible, and cost-effective platform to experiment, learn from mistakes, and build the skills you need to succeed. So, gather your hardware and software, and get ready to unleash your inner network engineer in the exciting world of virtual labs!

    @broadcom.com @https://cybershujaa.co.ke/ 


    Philipine Cheptanui, CyberSec.

  • GET A FREE QUOTE NOW

    Get a free quote today—let’s secure your systems with tailored solutions!.

    Contact Form

    Powered by Blogger.
    ADDRESS

    00100, Nairobi, Kenya

    EMAIL

    koimaphilipine@gmail.com

    TELEPHONE

    +254 909-40575

    MOBILE

    +254 105-345885,